|
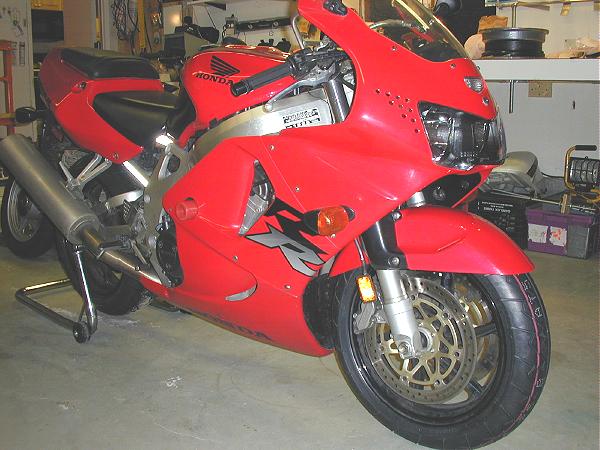
Credits, Caveats, Obligatory Taunts A major tip o' the hat to Mark Holbrook, who taught me just about everything I know about changing motorcycle tires. (Mark and I don't agree on all of the points discussed in our respective tire changing manifestos, so make sure to check out the section on "additional reading" where there are links to Mark's take on the subject.) Additional suggestions and assistance provided by Andrew Evans, Tim Atwood, Paul Luevano and Patrick Burns. Many of the photos below were taken by Crystal Trexel. Caveat: There are lots of different kinds of bikes with lots of different configurations. Rather than try to be correct for 100% of the bikes out there, I'll just tell you what I do when I change my tires, which (as you'll see) spend most of their time wrapped around the wheels of a 1998 CBR900RR. Your bike may be wildly different, but many of the steps will likely be similar; more on this in "step zero". Oh, and those of you with single-sided swingarms (VFRs, Ducatis, Triumphs, etc.) ... I bet you thought that single sided swingarms were pretty cool, huh? Well, not when it comes to tire changes. You won't be able to put the wheel on the balancer shown in this document, nor will you be able to use the wall-pivoted bead breaker without a helper to hold the wheel on the stand. But unless you plan to do without balancing (not recommended!), you'd either need to make a jig that'd let you slide a 5/8" threaded rod through the center of the rim, or you'd need to take the bike to an Authorized Dealer for your marque to get your tires balanced. It's OK; the rest of us won't laugh at you. Much. Finally, make sure you read this whole document (or at least read a section or two ahead) if you try to do this stuff. If nothing else, it'll give you a chance to learn from some of the mistakes that I made along the way. | |
|
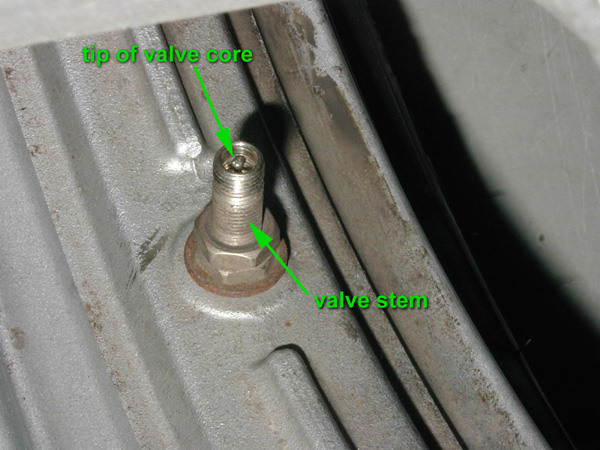
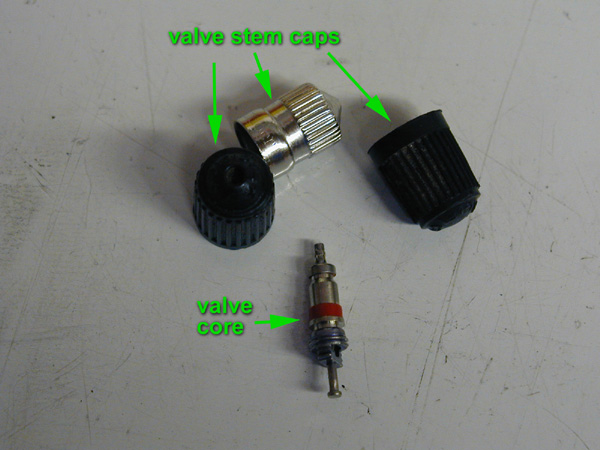
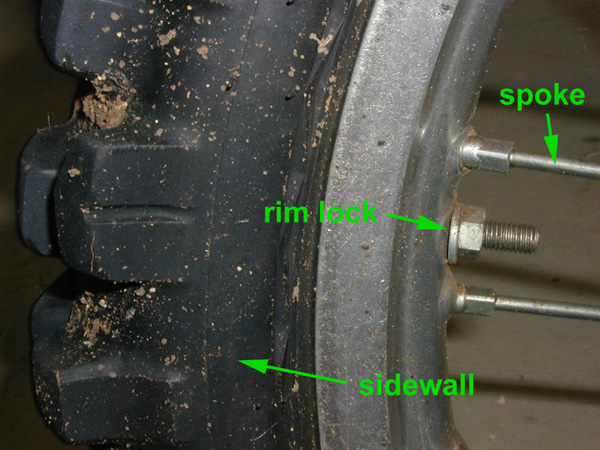
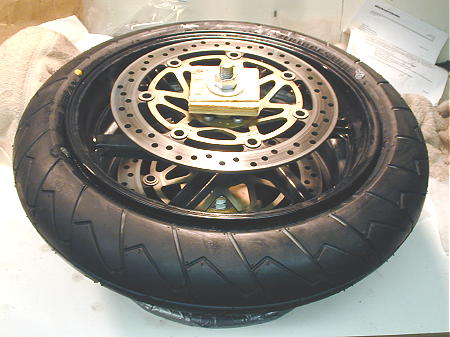
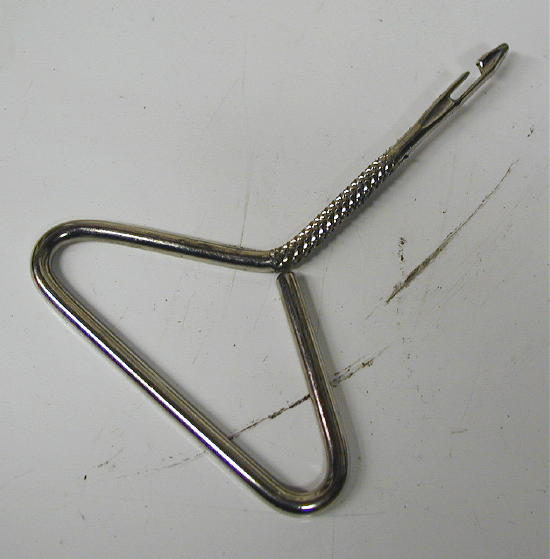
STEP ZERO: Terminology This document describes a method of changing so-called "tubeless" tires. Once upon a time, tires had inner tubes that held the air pressure required to keep tires rigid and support the weight of the vehicle. This was necessary back when wheels had spokes which necessitated many holes in the rim; now that most vehicles don't have spoked wheels, it's possible to get rid of the inner tube all together and simply have the tire itself hold the air. This makes life easier for a number of reasons, and is generally regarded as a Good Thing. Indeed, you're fairly unlikely to run across tube tires (tires that require inner tubes) unless you're working on dirt bikes (which need spoked wheels for flexibility and light weight) or cruisers (which seem to eschew any technology from the last five decades in the name of "style." Oops, am I showing my bias? Let's just move right along...) Anyway, the document you're reading now is a description of a method for changing the more common tubeless tires. But I know there will be folks interested in the steps required to change tube tires, so I wrote a little addendum on how I do that. Much of this information is still applicable, but that technique doesn't require nearly as much hardware -- a milk crate to hold the wheel and a couple of tire irons should do the trick. If this is your first time, let's review a little terminology. I refer you to some pictures I took: - Figure One: wheel, sidewall, tread/sipes, valve stem - Figure Two: valve stem, valve core - Figure Four: valve stem caps, valve core - Figure Three: spokes, sidewall, rim lock (tubed tire) | |
|
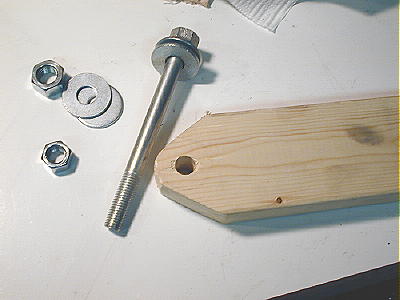
STEP ONE: Tire Changing Station: Parts Unless I'm changing the tires of a bike with spoked wheels (and tube tires), the first step is to build a tire changing station. Here's how I built mine. (If you've already got one, you probably don't care... skip ahead to step three.) Get the parts and accessories you'll need to build the tire changing station. The parts are all available cheap -- except for the shop press (which is optional!) you can probably buy all of this stuff for under $30. You'll need:
| |
|
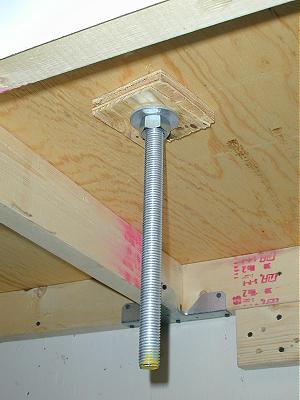
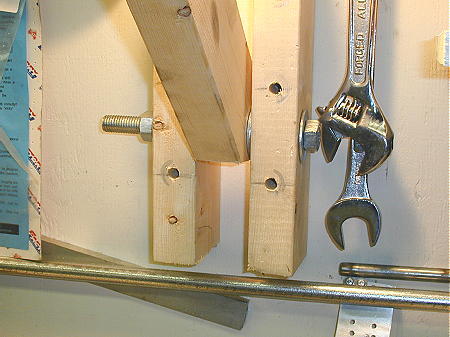
STEP TWO: Assembling the Bead Breaker If you're using a hydraulic shop press to break the beads, you can mostly skip this step. Mount the car wheel to the workbench and hold it down with the threaded rod, plywood blocks, washers, and 5/8" nuts. The bottom will probably look like this, and the top will look like this. You're all ready to go. Skip ahead to step three. For those of you going the 2x4" bead breaker route, some assembly required ...
| |
|
STEP THREE: Getting Ready To Change Tires
You'll also want the following accessories when you do the tire change, so if you're going out shopping, don't forget to pick up:
If your tire changing station is all set up and ready to go, and you've got the tires, it's time for step four. | |
|
STEP FOUR: Breaking the Beads
The most imporant thing we have to do in this step is to get the old tire off, and that starts with breaking the deathgrip that the old tire has on the rim. But first, we need to mark down a little detail that will become very important later on in this process. Then we can go about removing the old tire. | |
|
Mark the rim or rotor carrier (not the rotor itself!) with chalk or pencil to indicate the direction of rotation. Some rotors and rims (including mine) have this cast into them, but if yours don't, make sure you note it down. Unless you can figure it out because there's a speedometer pickup on one side, or a rotor only on one side or something, you'll need to mark the rims so when it comes time for installation, you put the tire back on with the correct orientation. If you can't figure out the direction of rotation from looking at the rim, but you do trust whoever did your last tire change, look (closely!!) at the sidewalls of the tires -- most indicate a direction of rotation. |
|

|
Not so fast, there, Tex. You aren't breaking any beads until you get the air out of the tire. Take the valve stem cap off, insert the valve core tool, then unscrew and remove the valve core. Once you unscrew the valve core, it's really going to want to come out -- and so will all the air behind it -- so have a good grip on the valve core remover, and be careful not to let the valve core go shooting off out of control. Let the air out, then remove the valve core and valve cap, and set them aside. |
|
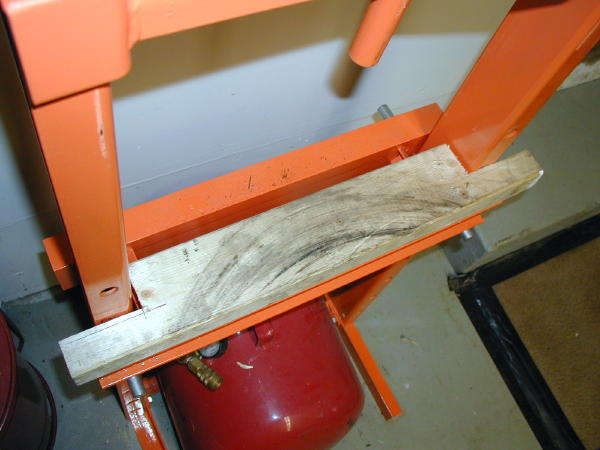
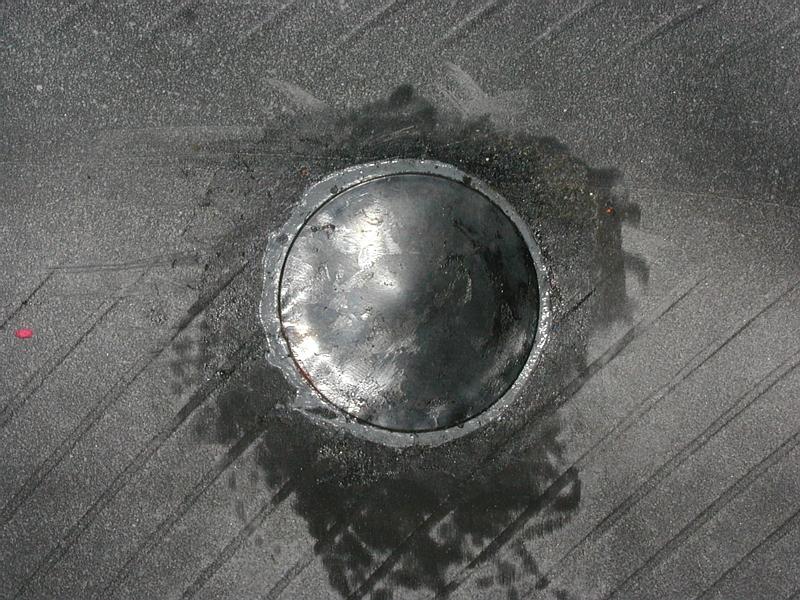
It's probably a good idea to cut a block of wood into a shape that fits the cross-bar of your press -- as you can see from how mine looks after a couple of tire changes, it has done an admirable job of keeping the bottom side of the shiny wheel from getting nicked by the metal press. Just be very careful that you aren't resting the very fragile brake rotors on it! | |
|
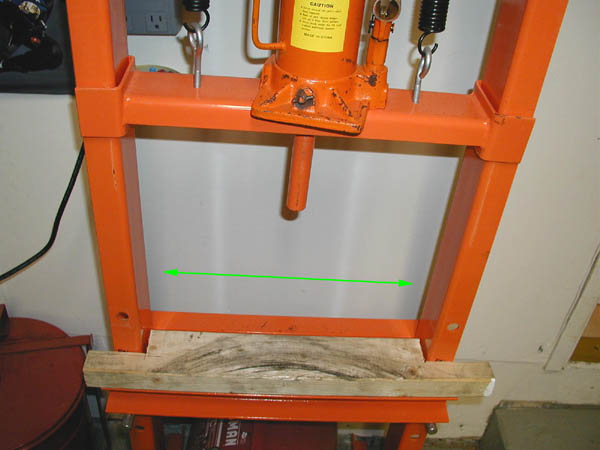
Anyway, now that the air has been removed from the tire, you can break the bead. Assuming you're using the shop press, put the wheel on the press, being very careful to keep brake rotors from harm, and using a scrap piece of 2x4", press down on the sidewall right next to the rim. (This should go without saying, but wear safety goggles and don't let the wooden block go flying!) This picture sort of makes it look like the bottom rotor might be resting on (or even touching) the aforementioned 2x4" ... here's the proof that it isn't -- don't let yours, either. |

|
|
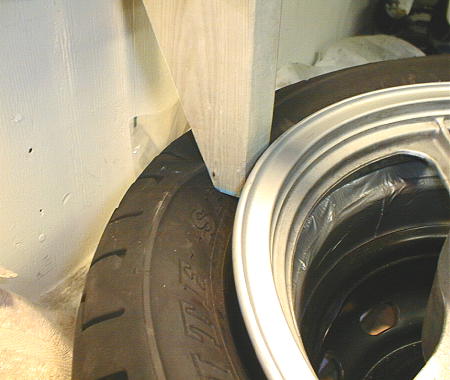
It can be very hard to get the wheel far enough into the press to get the block of wood pushing down right next to the metal edge of the rim. That's where you need to apply the force -- not on the rim, of course, but on the sidewall as close to the rim as possible. If you can't get the wheel in far enough to do this, the only real solution to this (aside from getting a shop press with more distance between the side supports) is to bolt the press to the floor and push the wheel forward (into the press) while you use the use the press to push the bead off. This deforms the tire a bit (since there's no air in it) and lets the wheel move closer to where you want it. But, really ... the bigger-shop-press solution is a lot safer. Pushing on the press is a good way for it to fall over and crush stuff. And to hurt yourself. If you can, try to break beads with the wheel parallel to the floor -- tilting the wheel so that the press-end of the wheel is lower than the end you're holding onto will probably look like it's helping to get the sidewall further into the press, but it's just making the bead removal job harder. Trust me. Don't tilt the wheel in an attempt to get it further into the press. | |
|
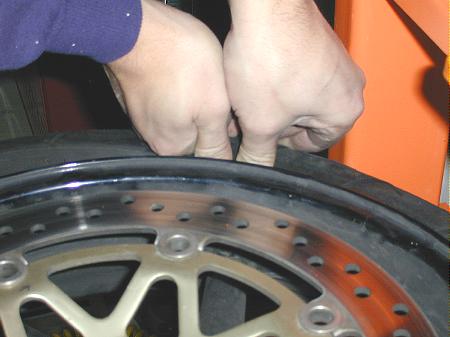
Once you get the bead broken (you'll know, and you'll probably hear a nice little pop! -- if you aren't sure, it probably isn't broken), you can go around and push the rest of the bead off by hand. If you can't do this, chances are that the bead isn't broken -- rotate the tire a little and try breaking the bead right next to your last attempt. |
|
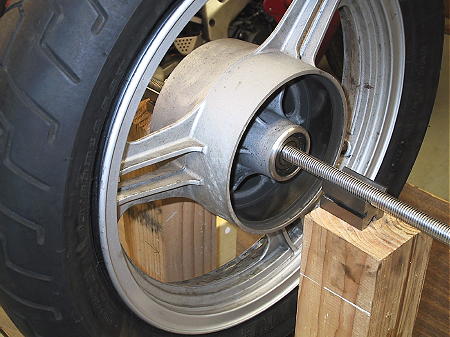
Congrats! Flip the wheel over and break the bead on the other side. Same procedure. When you're done, bring the tire over to the changing station and slide it down the threaded rod. Then slide a piece of plywood and a 5/8" washer down the rod, followed by a 5/8" nut, which you should make hand-tight -- no more. Just make sure that the wheel is firmly attached to the stand. (I know it sort of looks like I'm clamping down against the brake rotor carrier, which is a bad thing -- never use your brake rotors as any sort of clamping or attachment surface. But I'm not ... if you look closely, you'll (soon) see proof that the wooden block is only pressing down against the wheel hub itself. I'll have a better picture soon.) |

|
|
Wipe soapy water on the bead and sidewall. You'll want them to slide up and over the rim easily. Unless your tires are old & dried out, or it's really cold where you're doing the tire change, you'll probably be able to push the tire off once you get it started. But only if the bead gets nice and slippery! |
|
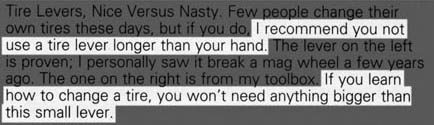
Before we start prying on the rim, one last warning: be careful! Don't bend or break your rim by forcing things -- particularly with long irons that give you tons of leverage. Take smaller steps if need be. Particularly those of you with magnesium or <cringe!> carbon-fiber rims. Easy does it! So now's the time... put a plastic rim protector over the edge of the rim. If you're not confident that the homemade rim protectors will protect the rim, either use a commercial rim protector or double the plastic over on itself. Use the hooked tip of the tire iron to grab the bead and lever it over the rim of the wheel, using the rim-protector-covered rim as the fulcrum. |
|
|
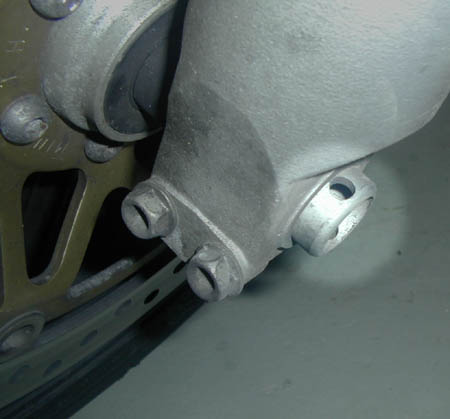
Pry the bead up and over the edge. You may need to insert another iron next to it to get a little more of the bead up over the rim. NOTE: in this picture, it looks like I'm pushing down on the brake rotor. Ye gads, I am NOT! Never ever ever ever do such a thing!! Applying any force to the brake rotor is a very good way to warp it -- and since they're upwards of $200/each to replace, BE CAREFUL. Curved tire-irons (pictured) can be very helpful when it comes to not touching the brake rotors. |
|
Once you get the bead up and over the rim in one place, the rest of it should come pretty easily. You might need some additional soapy water (or some minor levering with an iron) to get the lower bead off, but often they just slide up and off if you push hard. If not, just pry a little more off (with irons and rim protectors) until you can just push the thing off. |

|
|
All right! With the tire off, we're almost halfway there! A little balancing, a little mounting, and some more balancing, and you're all done! |
|
STEP FIVE: Balancing, Part I | |
|
Tires last longer (and will provide marginally more traction) if they
are balanced. "Balanced" means that spinning the wheel doesn't
cause the axle to want to move off-axis. You'll only get this
condition if any heavy spots on the wheel are balanced with a little
added weight on the opposite side (180 degrees around) to cancel it
out.
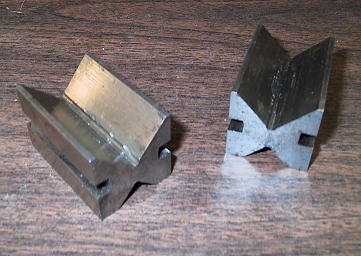
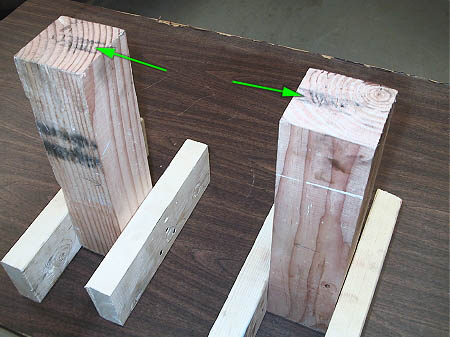
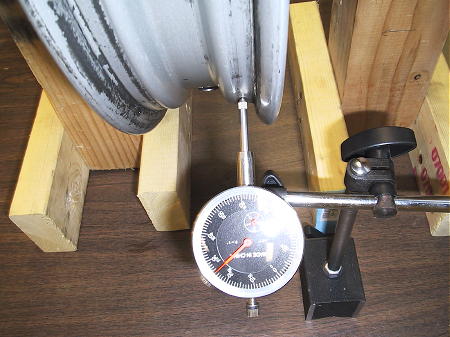
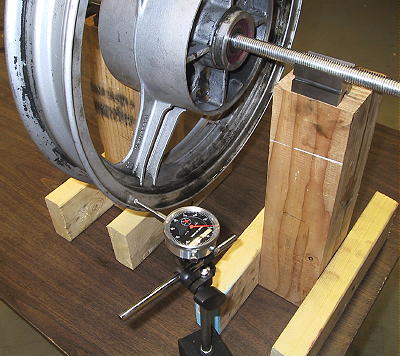
Traditionally, the valve stem is thought of as the heaviest point on the rim. So tire manufacturers mark the lightest point of each tire (usually with a paint spot on the sidewall), and you're supposed to line the paint spot up with the valve stem. Except that the valve stem isn't always the heaviest spot on the wheel. So it behooves you to put the wheel on some balance stands and find its true heavy spot. Once you do, you line the marked light spot of the new tire up with the heavy spot on the rim. By lining the light spot of the tire up with the actual heavy point on the rim, you often need less taped-on weight to balance the wheel -- and sometimes none at all. (Note: we're not adding weight to the wheel yet -- that'll come in step 8 -- right now we're just finding its heavy spot.) Remove the old wheel weights, and clean off any residual tape and adhesive remnants with a cleaner that won't damage the paint. To be perfectly correct, you should probably put the valve core back in and the valve cap back on, so go ahead and do that. For rear wheels, you don't need to remove the sprocket carrier/cush drive, or any of the rubber dampers, though if you have it's probably OK. If your rear wheel's cush drive has a bearing that helps hold the wheel on-axis, you may want to have the cush drive on when you balance the rear wheel. Just make sure that if you need it, you put everything back ... a single missing rubber bit from the cush drive will throw the balance off completely. Slide the axle (or threaded rod) through the wheel bearings, and put the wheel on the balance stand. The balance stand I use isn't much -- just some 4x4"s with 2x4" bases. A friend of mine uses stacks of bricks. If your wheel bearings are in good shape, this will work fine. And if they aren't, get new ones. Hint: if you can, do your balancing without the axle spacers installed -- the wheel will spin more freely. Why is that a good thing? Well, the more freely your wheel spins, the more accurate a balancing job you can do -- make sure the wheel spins freely during balancing! If your bearings have enough drag that the wheel just won't spin freely (or keeps trying to roll the whole assembly off the stand!), you might still be able to use a balancer like the one pictured below if you go to a bearing store, buy four ~1.5" OD bearings (without grease), and screw them to the insides of the balance stand such that they can rotate and cradle the axle (or the threaded rod) without letting it rub against the wooden stand. If you do this, draw some diagrams and measure things carefully before you try to set it up. Or you could buy some V-blocks and hold the axle/threaded-rod in place that way. Or you could nail a long nail on both sides of the axle (on both sides of the top of the stands) to prevent the axle from falling off. If you can't get a stand-up balancer to work, find a place where you can set up two parallel, straight, and level 2x4"s, and use those to hold each end of the axle up. Then it's OK for the wheel to roll around a bit -- just make sure the 2x4"s are really parallel, reasonably straight/unwarped, and 100% perfectly level. (Two sawhorses, maybe?) You can also drive a nail into the top of the 4x4"s on either side of the axle (on both 4x4"s) to hold the axle in place. Or if you have them and can keep them from falling over, you could also use two 3' aluminum carpenter's levels. (A metal surface will let the axle roll more freely -- better balancing.) You may be able make the parallel 2x4"s or aluminum levels more stable with C-clamps holding them down against a workbench or table. If you can't seem to make any of this work, you can always buy something like the $140 Weigl-Telefix Wheel Balancer Stand. If you make a wooden stand, consider putting notches on both sides of the top. Why? Two reasons: 1) This will discourage the wheel from rolling off the stand, and 2) This will keep the axle stationary, giving you a chance to do runout inspections on the wheel with a dial indicator. Which is a good thing to do as long as you have the wheel off. If you can't cut notches in your balancing stand, buy some V-blocks and use them to cradle the axle or threaded rod while you measure radial runout. Mine cost all of $6 at a used tool store. (Incidentally, don't try to measure axial runout, since, unless you can prevent the wheel from sliding on the axle or threaded rod, you won't get reliable measurements. Measure axial runout when the wheel is back on the bike.) Your bike's service manual will be able to tell you how much runout is too much. | |
|
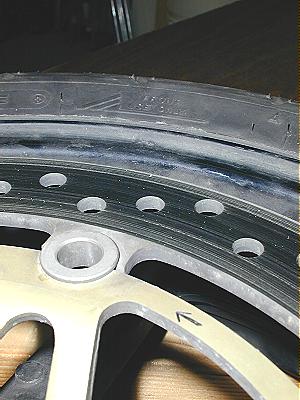
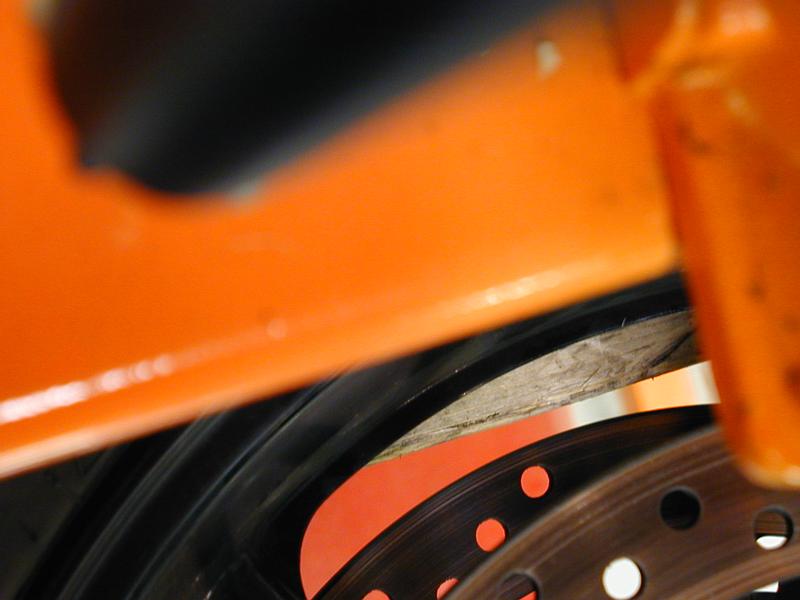
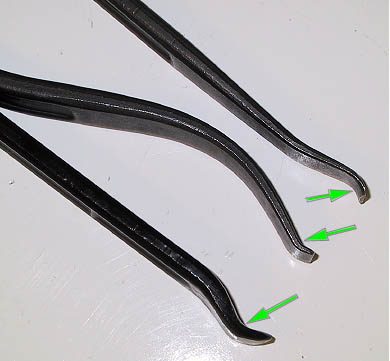
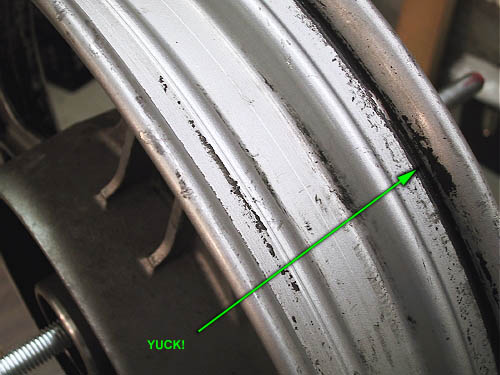
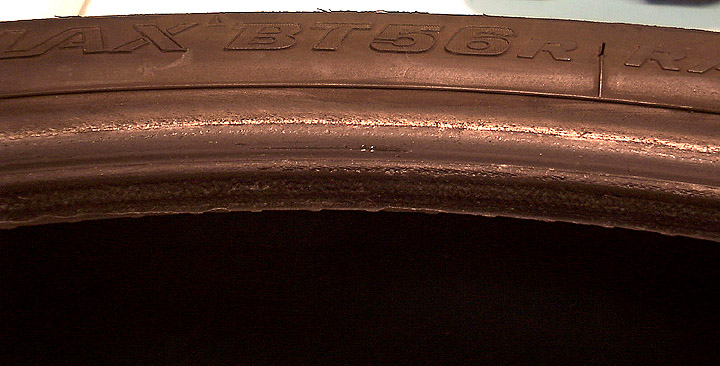
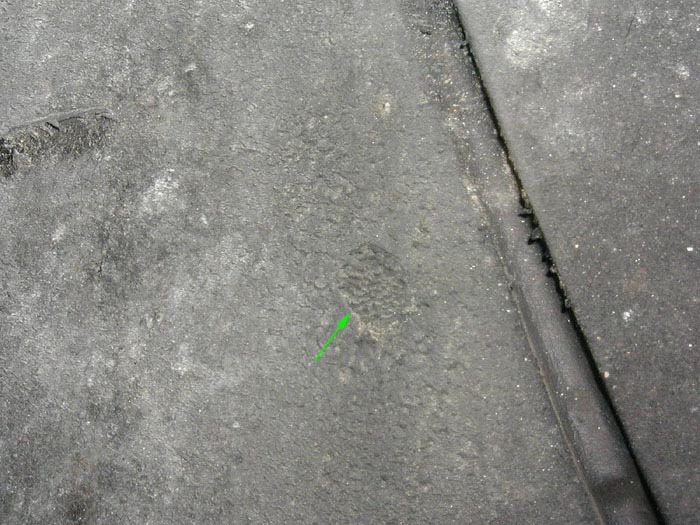
While you have the wheel off the bike and the tire off the wheel, it's probably a good time to inspect the lip on the wheel that the bead sits on. (What the green arrows are pointing to.) Check this area for old rubber, dirt, scrapes, etc., and make sure to clean/repair it -- otherwise the tire might not hold air. You should probably err on the safe side and give the bead ridges a once-over with a Scotch-Brite (tm) pad to clean them up a bit. Also, wipe off any excess soapy water or tire lubricant. You don't want this stuff inside the tire, or throwing off your wheel-balancing efforts. Ditto for brake dust, grease, grime, etc. Don't let this stuff throw off your wheel balancing -- clean the wheel before you balance it. |

|

|
Spin the wheel slowly (being careful not to let it fall off the stand) and see where it stops. Mark the wheel at its lowest point -- 6-o'clock. Spin it a bit more and see if it consistently stops at that point. If a point on the rim spins past 6-o'clock (the lowest possible point) and the wheel slows and changes direction so that the point swings back to 6-o'clock, you've probably found the heavy spot. (The heavy spot will always try to work its way to the 6-o'clock position.) Once you find the heavy spot, mark it. You'll want to line the light point of the tire up with this heavy spot. If the wheel always stops at different points and doesn't seem to have a preference about which point ends up down, that's fine -- assuming that the wheel is spinning freely and isn't stopping randomly due to excessive friction, this just means there is no heavy spot on your rim. When the time comes, you can put the light spot on the tire anywhere. On the plus side, the wheel's heavy spot shouldn't ever change, so mark the heavy spot in a way that you'll be able to find it next time. You should still check for the heavy spot each time, but you'll be more certain that you've found the heavy spot if it seems to be the same as it was the last time. |
Another technique that I had recommended to me (thanks, Bob!) was to put the tire on a stand as described above, but instead of spinning the wheel to find the heavy spot, you rotate the axle back and forth. Huh? Here's how it works. You hold one side of the axle stationary on the stand such that it won't fall off, but can be rotated on its axis. The nails-on-either-side-of-the-axle trick would work well here, as would using V-blocks if you hold the V-block with your hand. Then you grab the other end of the axle and rotate it back and forth. This should be enough to overcome the friction in the wheel bearings, and the heavy spot should drop to the bottom. Some axles have a hole on one end which might make spinning the axle easier -- slip a nail or a thin screwdriver through it and hold onto that. | |
|
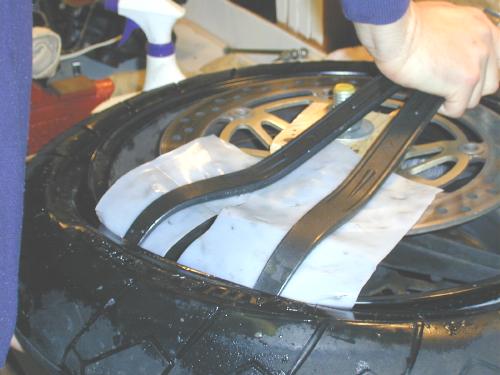
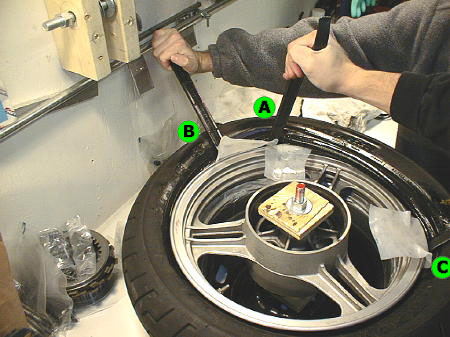
STEP SIX: Mounting The New Tire Remove axle and set it aside. Bring the wheel back to the tire changing station and slide it down the threaded rod. Put the plywood, washer, and 5/8" nut back on as before. If you built the wall-pivoting bead-breaking bar, you can use it in the various stages of this step to help you force the bead down over the rim. But it's not necessary; irons work just fine, too. | |
|
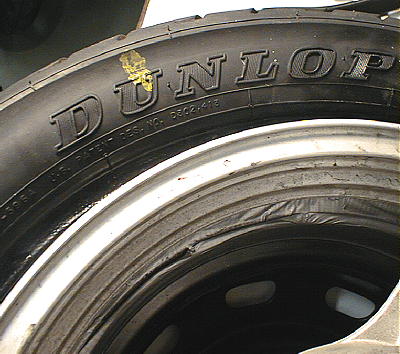
Bring the new tire over and line the paint spot indicating the tire's light spot with the mark you made on the rim indicating its heavy spot. (Here's another example of what a light-spot mark on a sidewall looks like.) Keep in mind that you need to mount the tire in the right direction, so also look at the rotation direction mark that you made earlier, and the rotation direction mark on the sidewall. You may need to flip the tire over to get the rotation direction right -- keep the heavy and light marks lined up if you do so. In fact, STOP NOW and verify that you put the tire on the right way. Get the lower sidewall and bead soaped up, and prepare for the final battle. Don't apply too much soapy water here -- if too much of it stays in the tire, it can throw off the balance, corrode the rim, possibly break down the rubber, etc. Remember: use a wet-but-not-dripping sponge. If you get the lower side's bead nice and soapy, and you get the angle just right, you can sort of slam the tire on and very quickly get the thing halfway on. Here's a QuickTime movie of me doing it (1.2M) -- watch the movie in slow motion and pay attention to the angle of approach. Soapy sidewalls are the key, and don't even think of trying this on a front tire with large brake rotors -- it's too easy to damage them if you miss! |

|
|
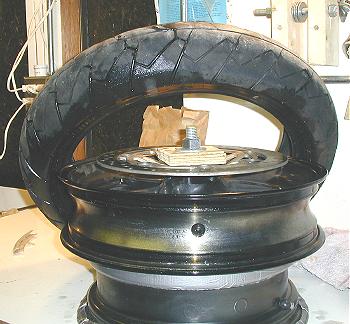
You shouldn't have too much trouble getting the tire to this point (though sometimes it helps to have two people.) Since you did such a good job of soaping up the lower bead, you should mostly be able to push that side down over the top of the rim. Once you get one side down over the rim, pushing it down towards the center well of the rim should help, as it gives the opposite side of the tire (the part you're about to lever over the rim) more slack, making your job much easier. (More on this shortly.) You'll probably need to use a tire iron or two (and rim protectors!) to pry the last side over, but the bottom bead -- and first half of the top bead -- will slide over pretty easily. |
|
Before going on to the last half of the top bead, you'll probably want to put a little tire lubricant/soapy water on the edge of the bead that's going to have to slide over the rim. But if you're doing this by yourself, you may not want to -- skipping the lubricant may help prevent the bead (that you just levered over the rim) from slipping back up and over. You can always add a little soapy water or lubricant later if need be. Hint: It'll give the end you're trying to pry over the rim some very useful slack if you can keep the beads on the other end of the rim down in the well between the bead ridges. If this doesn't make sense, look at this diagram. See how if the left side of the tire's bead is sitting up on the lip, then the right side (that you're trying to lever over) is held closer to the rim and doesn't have as much slack? Ideally you want the beads to be sitting in the well in the middle of the rim, so the other end -- the end you're fighting to lever over -- has as much slack as possible. If you're having trouble doing all of these things at the same time, you might be able to hold the top bead down in the middle of the wheel well with a small block of wood wedged between the sidewall and the underside of the rim. (Be careful, of course, not to let any wood bits fall into the tire!) Some people also report success holding the upper and lower sidewalls together (in the middle well of the wheel) with multiple C-clamps on the sidewall. I've never needed to do this, but as long as you're careful not to harm the sidewall, it sounds like it could work. It'll usually be enough to push the beads at the opposite end into the center well of the wheels just once. But if you're mounting low-profile tires like those found on the back of modern sportbikes, the forces you're applying to the end that you're levering over will probably keep seating the beads on the opposite side. Which is what you want -- eventually -- but for now you need slack, so you don't want the beads seated yet. This just means that you'll need to push the opposite-end's beads (top and bottom) into the middle well of the rim a couple of times. This ranges from "no big deal" to something like your own personal reenactment of Sisyphus' little rock game. If you're getting frustrated here, review the diagram above and make sure you have helpers. |
|
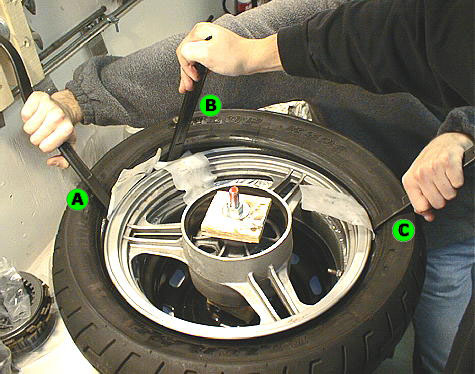
(Astute readers will notice that I switched wheels. Yes, you're very smart. Shut up.) Put rim protectors and tire irons at the midpoints where the bead goes from being under the rim to being over the rim -- about 9-o'clock (we'll call this "iron A") and 3-o'clock (we'll call this "iron C") in this picture. Use irons A and C to hold the bead below the rim -- otherwise you'll pry the bead down under the rim on one side, and it'll pop up on the other. Actually, you're going to need your hands free -- have a helper hold the irons for now, just like in the picture. Your helper won't need to put much force into this -- we're just using these irons to anchor the bead. |

|
|
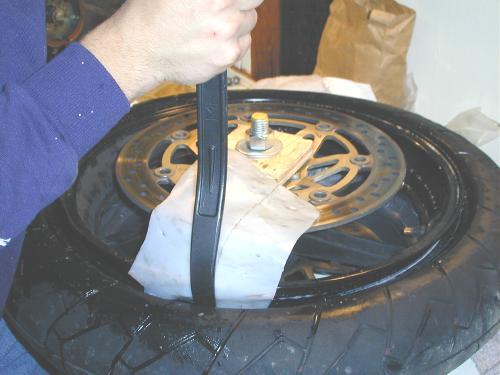
Insert another rim protector and the third iron ("iron B") between the two that are already in there, about 3-4" from iron A -- somewhere around 11-o'clock in this picture. Use it to pry the bead over the rim. If you're having too much trouble prying the bead over the rim, move the new iron (iron B) a little closer to iron A -- it'll be easier to pry the bead over. |
|
Once you pry the bead over the rim, the iron that was at 9-o'clock (iron A) won't be doing much anymore, since iron B is what's holding the bead down. Have your helper switch to holding iron B. Remove iron A. |

|
|
Insert iron A another couple of inches around the rim. Pry the bead over the rim at this new point, then remove iron B (which was at 11-o'clock, and is now not doing anything), and re-insert iron B a few more inches around the rim. Pry the rim over there. Etc. |
|
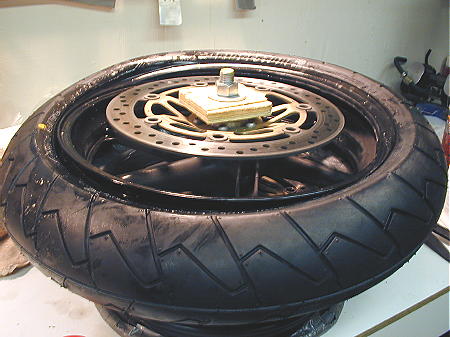
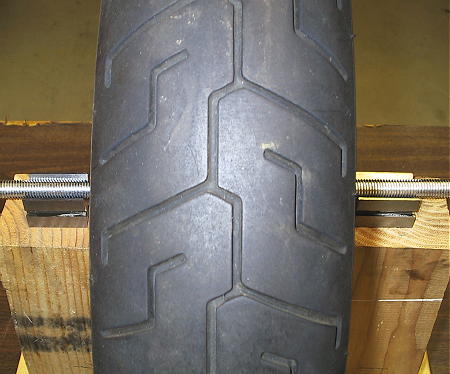
We're getting pretty close here. Keep leap-frogging the irons and rim protectors around the rim, prying the bead over bit by bit. Eventually you'll get the whole thing over, and the tire will look something like this -- the bead isn't seated, but it's been levered over the rim all the way around. |

|
|
Hint: If you're having trouble with this step, there are a few tricks you can try. First, if you don't have a helper, you might be able to hold an extra-long iron under your arm while you manipulate the other two. Be creative -- and careful. Second, try leap-frogging the irons around the rim in smaller steps. The smaller the distance between the irons, the more points you'll have to pry from... but you'll also have to use less force. Never try to force things -- breaking or gouging things gets expensive, not to mention that you can hurt yourself if things slip. Finally, don't forget the previous hint about pushing the beads on the opposite side down into the well in the centerline of the rim -- you need all the slack you can get, particularly with low-profile rear tires. (Which will probably keep trying to re-seat their beads on the side opposited the end you're working on. Don't let them! Helpers can also push the opposite side's beads down into the center of the rim throughout this step -- it often has to be done multiple times.) |
|
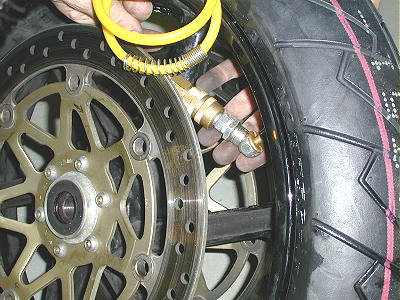
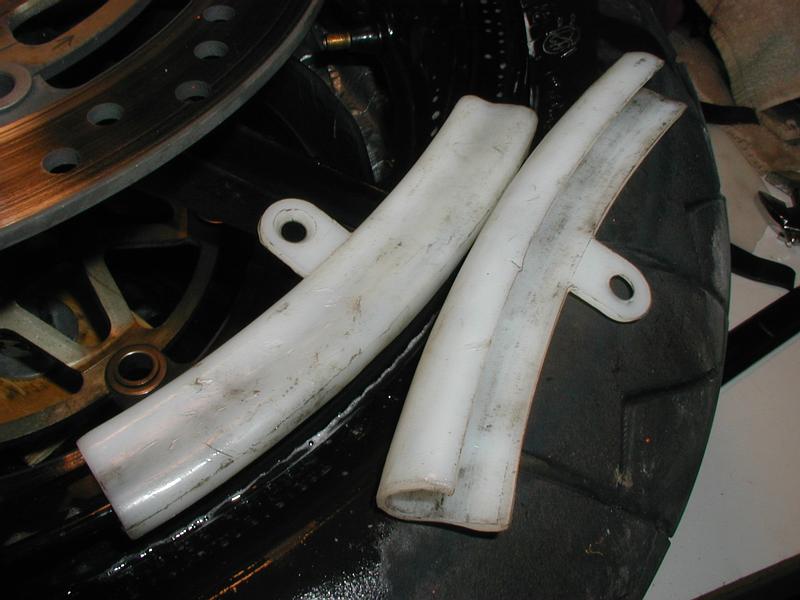
STEP SEVEN: Seat the Beads & Inflate the Tire Congrats! It's safe to put the tire irons and rim protectors away. Pat yourself on the back, then take the valve cap off. You also want to take the valve core out if your tire chuck doesn't need it to trigger the air flow. (Many chucks do require the valve core to be in place, but it impedes air flow, so if you can possibly get away with not having it there, do so -- you'll need a lot less pressure to seat the beads. Really -- if at all possible, figure out a way to do this without the valve core in place.) It's time for the next-to-last step: seating the beads. I'll admit, up front, that this is my least favorite part. It involves inflating the tire to a high pressure such that the beads pop into the ridges along the edge of the rim that they sit in. (See the rim closeup in step five.) They do not typically do this in a subtle way. Most people suggest starting with 40-45 psi; if that fails to seat the beads, you'll hear (or feel) air rushing out along the sidewall of the tire. If this happens, you may need to bounce the tire around on the places where air is escaping. Sometimes bouncing the tire on this point flexes the tire carcass and moves the bead such the tire will seal, and you can build enough pressure in the tire to pop the bead into place. If nothing seems to be able to seat the bead, you might try putting a ratcheting-tie-down around the circumference of the tire, and constricting it -- which flattens the tire, and pushes the beads against the rim, and often gets the beads to seal. Or you can up the air pressure, but if you do so, you need to be very careful to only use a higher pressure to get the beads to seal -- reduce the pressure back down to 40-45 psi to actually pop them into place. | |
|
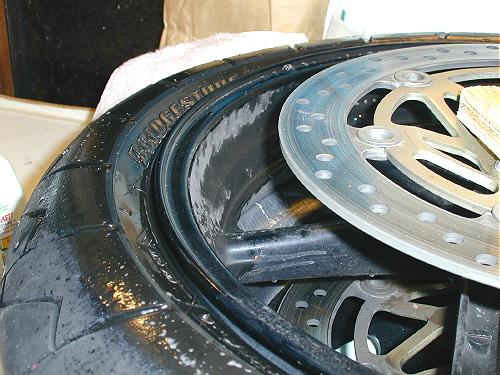
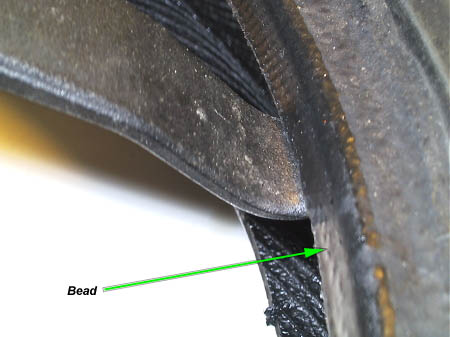
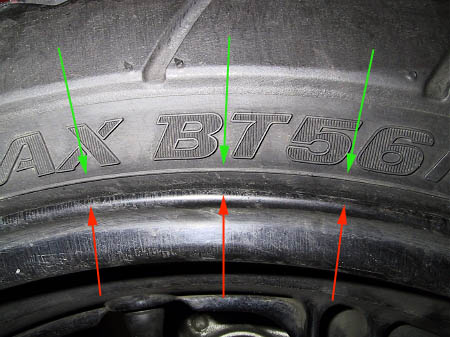
In any event, eventually, you will hear two distinctive, possibly LOUD snapping/popping sounds as the beads snap into place on the outer ridges of the rim. If you don't hear two, only one side is seated. Once both sides are seated, stop inflating the tire. It's OK if there's no valve core in place and all the air rushes out. The beads will stay seated, and you can put more air in shortly. As a matter of safety, inspect the beads carefully. Many tires have a raised line drawn on the sidewall -- you can tell that a bead is seated evenly because this raised line will be a uniform distance from the edge of the rim the whole way around, on both sides. If it isn't, the bead is probably not seated, and the tire isn't ready for use. Click on the link to this picture, where the green arrows point to the raised line on the sidewall that should be a constant distance from the edge of the rim (that the red arrows point to.) Remember to check all the way around on both sides. (Here's another shot of the raised stripe on the sidewall. It's the stripe right below the lettering.) |
|
Now that the beads are steated, reinstall the valve core (if it isn't
already in the valve stem.) Inflate/deflate the tire to the pressure
recommended by its manufacturer for your vehicle and riding style.
Reinstall the valve stem cap. Make sure to check the air pressure
again in a day or two, as it may need a tad more air at first. (And,
of course, make sure to check tire pressures before riding on any
tires.)
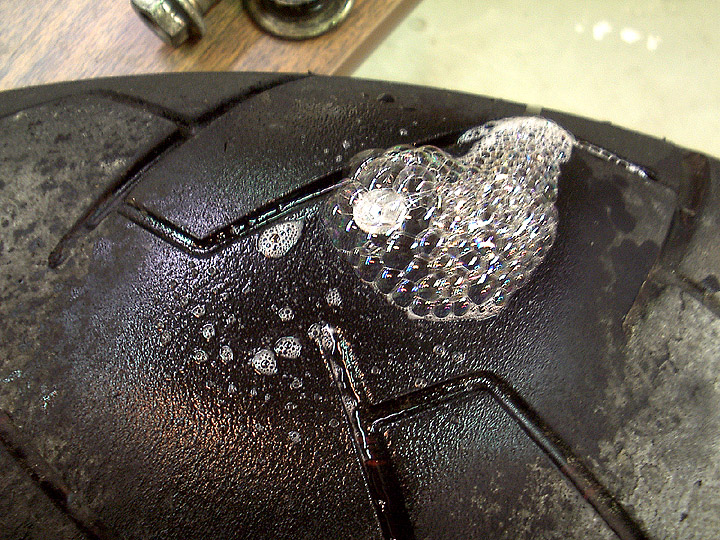
You can also use the residual soapy water to check for leaks. (If you were using a commercial or homemade tire-lubricant in place of soapy water all along, you'll need to switch to soapy water if you want to try this part.) If you see a soapy & wet part of the sidewall or point on the tread that's foaming like a mad dog, your tire has rabies. RUN!! Haha, no, actually, it's worse -- either the inside of the rim is scratched, or the tire has a puncture, and air is escaping (and blowing bubbles!) through the hole. Did you do it? Is the tire defective? That's something you'd have to sort out with the place that sold you the tire. | |
|
STEP EIGHT: Balancing, Part II | |
| Now that you've got the tire all mounted, it's time to balance the thing. If you haven't already, put the valve core back in the valve stem, and reinstall the valve stem cap. Take the wheel over to the balance stand, slide the axle through it, and put it up on the stand. Leave the axle spacers out to help the wheel spin more freely. As before, if your bearings have enough drag that the wheel just won't spin freely (or keeps trying to roll the whole assembly off the stands), find a place where you can set up two parallel and level 2x4" boards, and use those to hold the axle up. | |
|
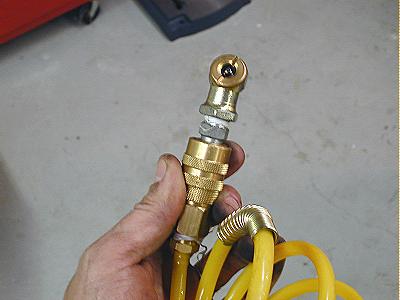
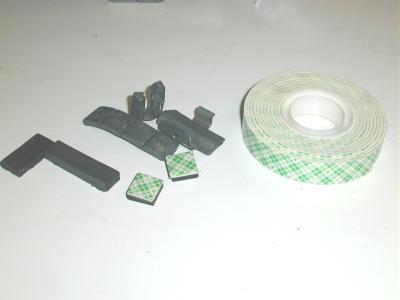
Just like before, find the heavy spot. If the light spot on the tire and the heavy spot on the rim cancelled out, maybe there isn't one. If there is a heavy spot, add weight on the opposite end of the rim (180 degrees away) in small increments, until the heavy spot disappears. When attaching weight to the wheel, put it as close to the centerline as possible. You should only need to add weight in one spot -- if you find that you have to add weight in multiple spots, you messed up. Move the weight to the middle and try a little less of it. If you're adding more than one "unit" of weight, make sure it's balanced evenly on the left and right sides of the rim centerline. Half of the weight should go on each side, again, as close to the center as possible. Once you know how much weight to install -- and where it goes -- clean that spot with a paint-safe contact cleaner, and while it dries, put double-sided tape on the bottom of some strip weight. Then put it on, and cover the spot with color-matched duct tape. Et voila! One balanced wheel. |

|
|
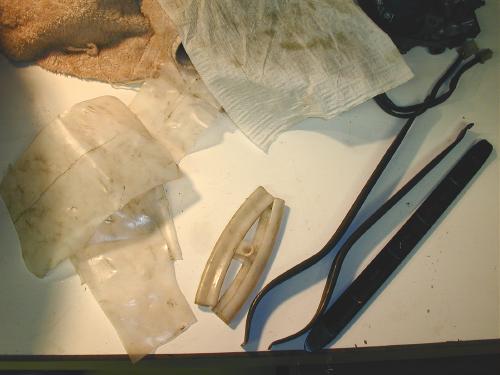
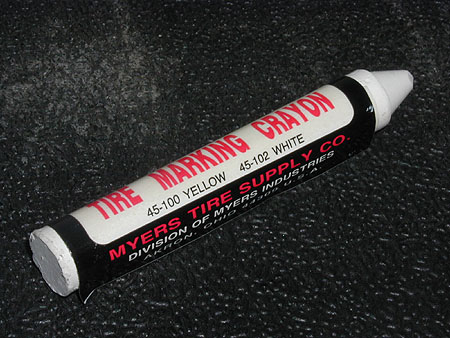
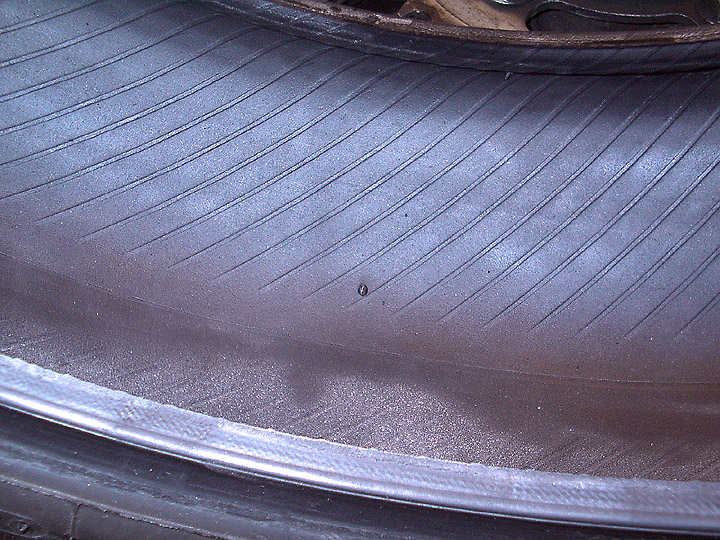
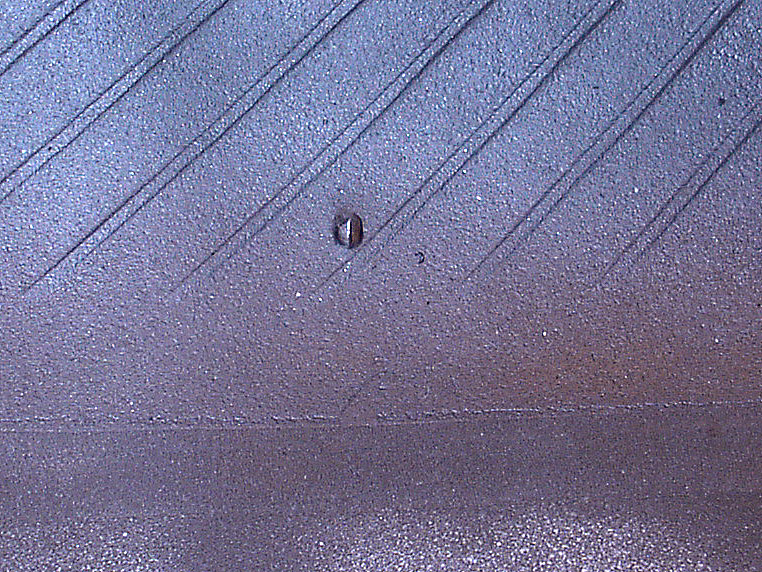
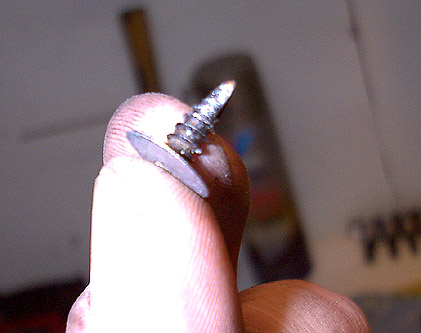
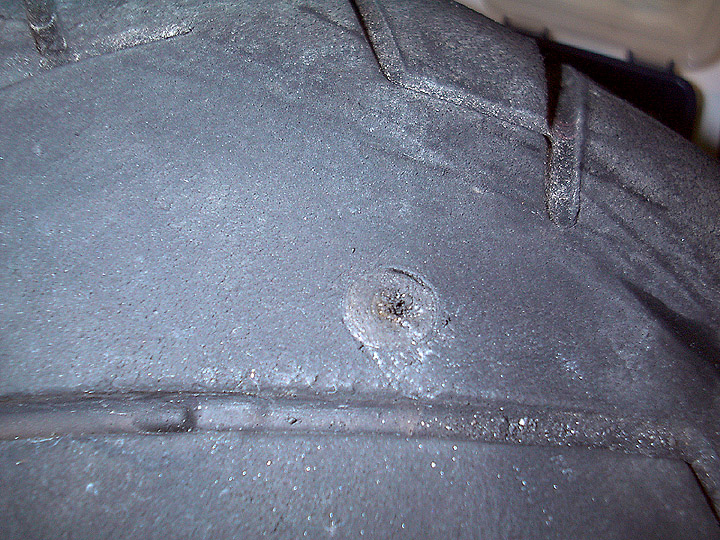
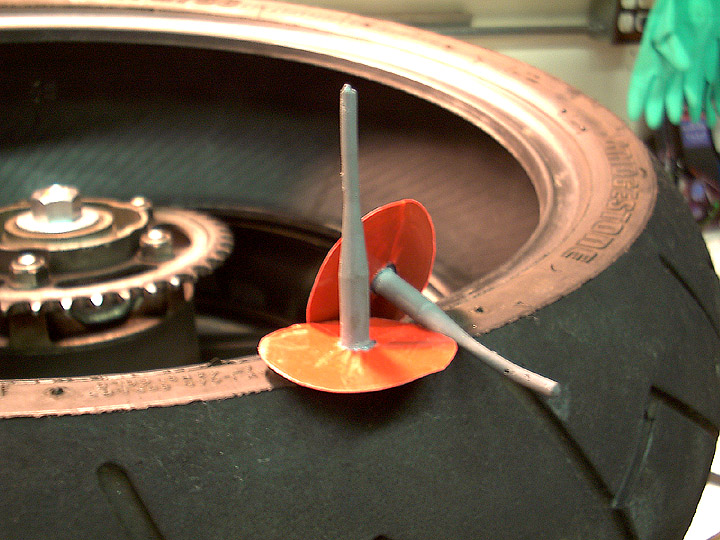
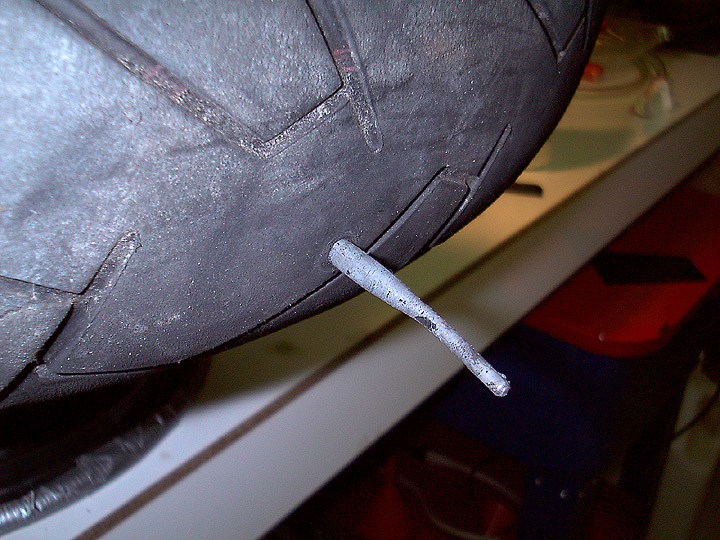
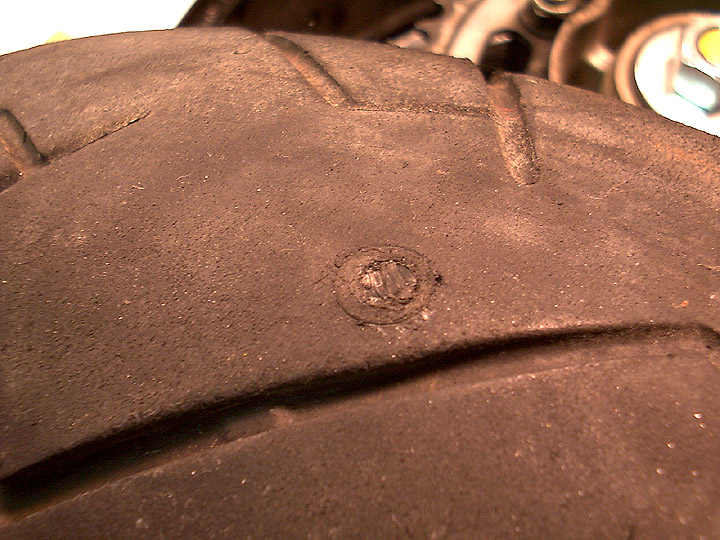
EPILOGUE: I got a flat! So a couple of months have gone by, and I've enjoyed my lovely new tires, but suddenly I notice a shiny spot on the rear tire. Oh no! Please tell me it's only a thumbtack or something... did it go all the way through? Out comes the trusty bottle of soapy water, and I spray the spot down. Results? the tire is foaming like a mad dog. So it did go all the way through, and air is leaking out. Eeek! What should I do?? Well, the puncture is in the rear tire, towards the middle... maybe I'll take the tire off and see what got damaged. (I would never consider trying to repair a punctured front tire or any tire with a damaged sidewall. Anything like that gets replaced -- immediately. But rear tires without sidewall damage? It depends...) Hold on a second; first things first... I can't stress this enough: Repairing tires is extremely dangerous. You may have trouble even finding shops willing to patch tires for you -- and they're professionals that repair bikes for a living! I STRONGLY RECOMMEND THAT YOU NOT ATTEMPT TO REPAIR DAMAGED MOTORYCLE TIRES. TAKE DAMAGED TIRES TO A PROFESSIONAL MOTORCYCLE SHOP FOR INSPECTION AND REPLACEMENT/REPAIR. The chances of a tire blowout are too great to risk your life on a tire repair. Tire repair failures that are merely inconvenient on a car tire ("oh, look, it's flat again") can cause severe & fatal accidents on motorcycles ("oh, look, he's dead.") Therefore, this information is provided only to illustrate how the author performed the procedure, and NOT as instructions on how to perform it yourself. The author strongly discourages you from trying this yourself, and cannot be held responsible for any consequences if you choose to disregard these warnings. Ok, now back to our regularly-scheduled program... When I went about repairing my tire, the first thing I did was remove the tire from the rim, as described above in step four. Sure enough, the screw was sticking all the way through the tire (here's a closeup.) I pried the little bugger out with a screwdriver, and set it aside for subsequent ritual destruction. Then I used a puncture cleaning tool to clean the hole and a buffing stone to rough up the inside side of the tire around the puncture. Basically, I was just following the instructions that came with the "mushroom" tire patches that I got. I won't try to explain the theory behind which sorts of plugs/patches/etc. are best, since I'm not an expert and probably wouldn't do a good job. But I've heard that the "mushroom" patches are the safest things to use, so that's what I bought. Following the instructions that came with the patches and the special tire/rubber adhesive that I got at an auto parts place, I pushed the plug part of the patch through the hole from the inside out, making sure to get lots of adhesive over the surfaces that were going to have to stick together, and also taking care to press air bubbles out of the junction. Then I cut the excess rubber off, leaving a nice, clean repair. After allowing the adhesive time to dry, I inspected the repair, which seemed to be solid and successful. Then I mounted the tire, re-balanced it (the patch weighs something, y'know), and put it back on the bike. Now let's just hope I don't experience a catastrophic blowout causing a firey crash... Here's what the installed patch looks like from the inside of the tire ... the darker area around the patch are roughing marks from the buffing wheel. News flash: Well, I'm not dead yet, and 700 hard miles later, the patch is essentially indistinguishable from the rubber it replaces. Here's a closeup. News flash: A mere hundred miles into another new set of tires, and the rear tire picked up a broken masterlink clip and got cut in a very non-repairable sort of way. The broken masterlink clip cut the tire in addition to puncturing it; to the best of my knowledge, there are no products available for repairing cuts, so the tire had to be thrown out. Sigh. When life hands you lemons, you make lemondade, right? Well, life has been handing me a lot of lemon--er, sharp objects lately (via my rear tire), so now I have a gallery of Things I've Found In My Tires. Epilogue to epilogue: A set of tires (or two) later, something put a very deep cut in my rear tire. It was getting to be time to replace the tire anyway, so I wasn't too upset, but I do plan on getting a little more use out of the tire at some point, and I want to remember what condition it's in before I do. I think I'm going to patch the tire rather than hope that the cut doesn't eventually fail on its own. Owning a tire crayon makes it very easy to mark the tire with the location of the cut and how much use it has seen to date. | |